How to Use Weatherwood Reactive Stains

Step 1 of the Weatherwood Finishing System

Step 1 — Create the Patina (Reactive Stain)
Step 2 — Refine the Tone (Maintenance Oil)
Step 3 — Protect the Finish (Architectural Topcoat)
Step 4 — Exterior Protection (if applicable)

The 2 Rules of Weatherwood Reactive Stain

  • Apply a generous, even coat.
  • Do not wipe it back off. Let the wood absorb the stain naturally.

If you still have product, color, or species questions after reading this page, visit our FAQ page.

Before You Start

Prep

  • Mix and strain stain before and during use.
  • Test on a scrap of your wood species first — color results vary by species.
  • Pour what you need into a separate plastic container. Keep the original tightly sealed.
  • You can water-pop wood before staining for deeper penetration.
  • Stains are water-based and low-odor — safe for indoor application. Safe around plants and soil outdoors.

Sanding

New / Raw Wood: Sand with 60–80 grit to open the grain. Do not sand above 120 grit or color will be reduced. Sanding is not necessary on rough cut, wirebrushed, or rough sawn lumber.

Previously Finished Wood: Strip and/or sand to raw wood. Chemical strippers are fine — sand afterward with 60–80 grit to remove residue.

Avoid

  • Do not apply below 50°F.
  • Do not allow stain to contact metal. Do not store in metal containers.
  • Do not use wood conditioners or primers — they close pores and reduce reaction.
  • Use a new brush. Never cross-contaminate with pigment-based products.
  • Stains will stain concrete, clothing, and floors — protect surrounding surfaces.
Sanding Prep

Choose Your Application Method

Choose the application method that matches your project type:

  • Brush / Rag — cabinetry, furniture, millwork, and jobsite work
  • Spray / Production — larger projects, shops, and repeatable application
  • Flood / Submerge — industrial lines, vats, and assembly-style processing

Brush / Rag Application

Same Sample – Time-Lapse Drying

Brush or Rag

  1. Pour stain into a separate container. Keep the original tightly sealed.
  2. If using multiple containers, combine into a larger bucket for batch consistency.
  3. Use a new foam brush, synthetic brush, or clean rag. Foam brush gives the best results on smooth wood.
  4. Apply an even, generous coating of stain. Do not wipe it back off.
  5. Remove any standing puddles or bubbles with a wet brush.
  6. Allow to air dry. Dry time varies by species, temperature, airflow, and humidity. As a general guide, hardwoods may dry in about 30 minutes and softwoods in about 60 minutes.

Second Coat

  1. A second coat is generally recommended when refinishing wood to achieve the darkest shade.
  2. Results vary by stain color and species. See individual stain color pages for specifics.

Spray / Production Application

Spray Gun

  1. Pour stain into a separate container. Keep the original tightly sealed.
  2. If using multiple containers, combine for batch consistency.
  3. Mix and strain stain before loading into the sprayer. Viscosity is similar to water.
  4. Use an atomized spray gun and air compressor.
  5. Open the nozzle completely to drench the wood’s surface.
  6. Apply a heavy spray coat, typically 6–8 consecutive passes.
  7. Overlap passes to avoid spray stripes. This method provides fast, even coverage for production environments.
  8. Do not wipe off. Allow to dry.

Second Coat

  1. A second coat is generally recommended when refinishing. Results vary by color and species.

Flood / Submerge Application

Flood / Submerge

  1. Pour stain into a separate container. Keep the original tightly sealed.
  2. If using multiple containers, combine for batch consistency.
  3. Use an assembly line, flood system, or vat to submerge wood into stain.
  4. Ensure lines are completely clear of traditional stains. Flush clean before use.
  5. Hardwoods often require shorter dwell times than softwoods. Longer dips produce darker results up to each species’ limit.
  6. Leaving wood in too long can cause water marks, so expect some trial and error.
  7. Remove bubbles from the surface with a curtain flood system or wet brush.
  8. Do not wipe off. Handle by edges, air dry in racks, and do not stack wet wood.

Second Coat

  1. A second coat is generally recommended when refinishing. Results vary by color and species.

Dry Time

The reactive process is complete when the wood is fully dry. Typical dry time is 30 minutes to 2 hours depending on wood species, softness, climate, and project scale. Warm temperatures and air circulation speed drying. Humidity and temperatures near 50°F slow it.

Next Step: Refine and Protect

Reactive Stain creates the patina, but it does not protect the surface. Protect the finish with Weatherwood Architectural Topcoats.

Interior

Exterior

Find topcoat application examples on our YouTube channel. If you still have questions about color selection, species variation, mixing, topcoats, or ordering, visit our FAQ page.

Advanced Application: Hardwood Flooring

  • Materials for Hardwood Floor Application:

    • Paint Sprayer
    • ​Long-Handled Brush
    • Squeegee
    • Lint free cloth
    • Plastic Gloves
  • Paint Sprayer

  • Long handled brush

Floor Prep

  • Sand and vacuum thoroughly. Sand between 100–120 grit. 220 grit may seal the wood.
  • Water-pop floors for deeper penetration (recommended).
  • Do not precondition or pretreat. Bleach may affect color — test first.
  • If using multiple stain containers, combine into one bucket before applying.
  • Mix stain well before and during use.

Method 1: Bucket + Long-Handled Brush / Broom

  1. Edge the section with a brush or large sponge brush.
  2. Dip the broom into the bucket and push stain into the grain, cracks, and grooves. Flood or drench the surface — do not wipe on and wipe off.
  3. Work in sections, a few planks at a time. Tape off sections or keep a wet edge to avoid overlap.
  4. Work the full length of each plank. Do not stain half a board and return later.

Method 2: Sprayer + Long-Handled Brush / Squeegee (2-Person Team)

  1. Person 1: Starting at the farthest corner, use the sprayer to apply a 4–6 inch pour line of stain along the grain.
  2. Person 2: Use a long-handled brush or squeegee to equalize distribution. Push the finish into grooves and cracks. Do not remove — drench and let absorb.
  3. Work in sections, maintaining a wet edge. Work the full length of each plank.
  4. Person 1 pours more product as needed. Person 2 follows to equalize.

Dry Time: 2–4 hours. Warm air and good circulation speed drying.

Troubleshoot:

  • Fix raw spots while floor is still wet — blend with a wet brush.
  • Remove foam/bubbles from the surface with a wet brush before they dry.
  • Remove long-standing puddles (from uneven floors) with a wet brush.
  • Allow wood to dry fully before applying topcoat.

Topcoats for Floors:

Common Issues & Fixes

Spotty Color

  • You may have sealed the wood by sanding too finely.
  • You may not have applied enough stain.
  • You may have applied stain and wiped it back off.
  • You may have applied too thin a coat instead of drenching the wood.
  • You may have altered the chemical composition of the product or tried to water it down.

Solution:

  1. Sand the wood with 80 grit in both directions to open it back up.
  2. Reapply stain over the entire surface, drenching the wood and allowing it to dry naturally.

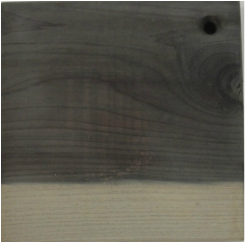
See spots in the middle of the Aromatic Cedar

Lap Lines

If you stained in sections but allowed the finish to dry mid-project, you likely created lap marks. Keep a wet edge and work in manageable sections to avoid overlap.

Solution:

  1. If areas are too dark from overlap, try buffing the lines lightly with 000 steel wool.
  2. If that does not resolve it, the best fix is to re-sand and start over.

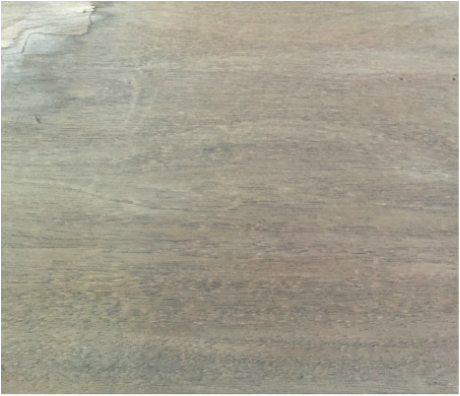
Client tried to stain half of this dresser, allowed it to dry, then tried to stain the rest.

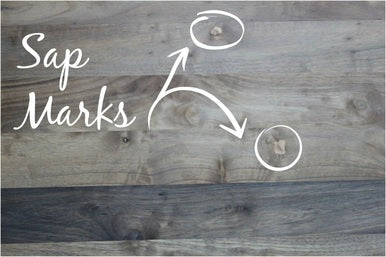
Sap Spots or Unreactive Areas

These usually happen where sap blocked the reaction or where previous finish was not fully removed.

  1. Sand the wood with 80 grit in both directions, especially in the areas that did not react.
  2. Reapply stain over the full surface, drenching the wood and allowing it to dry naturally.

Brown Marks During Drying

These marks usually occur when too much stain was applied or drying was too slow. Make sure there are no puddles failing to dry, avoid leaving projects sitting in stain, keep the environment above 50°F, and improve airflow when possible.

Solution:

  1. If areas are too dark, try buffing them lightly with 000 steel wool.
  2. If that does not resolve the issue, re-sand and restart the application.